

How To Repair Broken Wind Chimes
We all love the gentle and soothing sound of wind chimes, especially in the forenoon when you are chilling on the patio chair or sitting most the window in your room with a loving cup of coffee to kickstart your day. This can only happen if your air current chime is in perfect condition and the strings are intact.
You might want to look at your wind chime and make sure the delicate tone continues to fall on your ears. There can be several reasons for the failure of your wind chimes; we have talked well-nigh it later.
Also, if your wind chime stops producing the sweetness sound, it is ameliorate to know how yous can restore it and residuum it appropriately. This article talks about simple and articulate steps on restringing wind chimes.
Contents
- 1 Why Should You Restring Old Wind Chimes?
- two How to Restring Wind Chimes in Simple Steps
- 2.1 Select The String
- 2.2 Get Rid of Old Strings
- 2.three Sort Out the Chime Parts
- 2.4 Using New String
- 2.5 Restring
- 2.six Knit-Knit-Knit
- two.7 Tighten & Soundcheck.
- 2.8 Hang Information technology
Why Should Y'all Restring Former Wind Chimes?
For reasons like farthermost winds, cold temperature freezing the strings, tangling of strings that becomes incommunicable to untangle, and as the time passes past, the string commonly wears downwardly, to hear the harmonious sound one time again you should consider restringing wind chimes.
Restringing Them Will:
- Make it stronger to withstand farthermost temperatures.
- Prevent string breakage.
- Will save you some bills, every bit there will not exist necessary to get a new wind chime.
- Improves durability and renews the wind chime sound.
How to Restring Wind Chimes in Simple Steps
Select The String
Current of air chimes come with strings that are fabricated upward of cotton fiber or yarn commonly, and they wear out chop-chop. They are low-cal in weight and exercise non crave much strength. So, if you lot are planning to restring them, then expect out for strings that can be durable; for example, using polyester fabric, nylon string, and fifty-fifty fishing line can be ideal. They are flexible, can easily resist stiff winds & temperature changes, and will last forever.
Become Rid of Erstwhile Strings
At present that you have selected your thread, get rid of the old thread by slowly pulling it out, cutting any knots with scissors for quick piece of work. Replacing the whole cord is preferable, as it volition give great force to your wind chime.
On the other hand, if you modify but a portion of the string, and then the wind chinkle may crusade you some trouble, or the onetime string will wear out earlier the new one, thus requiring one more than replacement.
Sort Out the Chime Parts
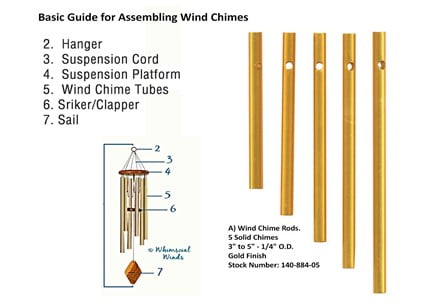
After taking out the former string, you should organize the chimes' part, equally they are not attached to anything but are held together using strings. Air current chimes take a plate or ring-similar thing on the summit and a ball below it surrounded past other parts. You should flatten all parts on the surface in their order, and it will be helpful when restraining the chimes together with the use of a new string.
Using New String
If y'all follow the concluding step carefully, it is bully because the task gets easier when everything is neatly bundled. Here you will require a needle, and it is time to bring every function together using a thread that volition be hooked to the needle.
Wind chimes parts have a small in them for y'all to pass the needle and thread. Manage the thread length equally you go through every part, making certain the issue looks very symmetric and stable. Lastly, cut the cord using pair of scissors.
Restring
Before stringing annihilation else, your focus should first be on stringing the top or bottom part. Cut 2-iii lines of thread or equally per the holes on the superlative of your wind chimes; along with these, you volition have to pass every other part through the holes. Once you are done with that, see to it that it is even so symmetrical and balanced, and arrange if required.
Knit-Knit-Knit
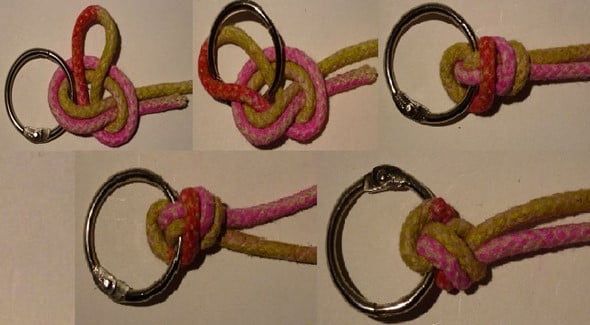
Now, it is time to knit up everything you accept been stringing. Knotting up the strings for securing your wind chime is easy, but because the tiny strings may cause a piddling fleck of trouble. You should choose the knot of your liking that can provide the needed strength.
You can go for Palomar knot, Solomon knot, and such others for the air current chimes. Do y'all non know how to tie such types of knots? The Internet is always there for your assistance.
Tighten & Soundcheck.
Later on tying the required knots, you should one time more look at the balance of the chime and encounter if it is symmetrical or not. After ensuring position, tighten the knots and hold the chime past the top to determine if it has turned out perfect or not.
For a little testing, bring the chime closer to the fan and observe if it is producing the melodious audio or in that location is some sort of incompleteness. If the sound is not good, you might want to loosen the parts and reorganize them.
Hang It

You are near restoring your wind chimes; the last thing to do is hang them at the desired place. We recommend hanging them on the beams either in the room or living area. Hanging them on the patio is a great idea; if you cannot find a axle there, attaching a hook to the ceiling and hanging it there can do the job! It is time to bask the sweet sound of your restored wind chimes daily.

How To Repair Broken Wind Chimes,
Source: https://www.organizewithsandy.com/how-to-repair-your-borken-wind-chimes-in-a-few-easy-steps/
Posted by: ellispowee1981.blogspot.com
0 Response to "How To Repair Broken Wind Chimes"
Post a Comment